As a follow-up on the last two HPLC Solutions discussions (HPLC Solutions #118, #119) regarding sample injection, I’d like to take the opportunity to describe the two most popular types of autosamplers in use today. These are what I call the “push-to-fill” design that is discussed here, and next time we’ll look at the “needle-in-loop” design.
Autosamplers simply are a device to make injection of samples easier. They include three basic parts: (1) a sample tray with indexing capability, (2) a mechanism to transfer sample from a sample vial to the injection loop, and (3) an injection valve. The sample tray typically holds individual sample vials or 96-well sample plates. Most have capability of ≈100 samples, but when 96-well plates are used, multi-plate units can allow injection of hundreds of individual samples without operator intervention. Some designs use a round tray that spins on a carousel mechanism with samples arranged in one or more circular rows. The tray is rotated until the desired sample is below the needle and the sample is withdrawn from the sample vial. Another popular design uses an x-y grid of samples on the tray with the needle mounted on a movable arm with x-y-z motion. The needle is moved to the vial, then lowered into the vial (or sometimes the vial is lifted to the needle).
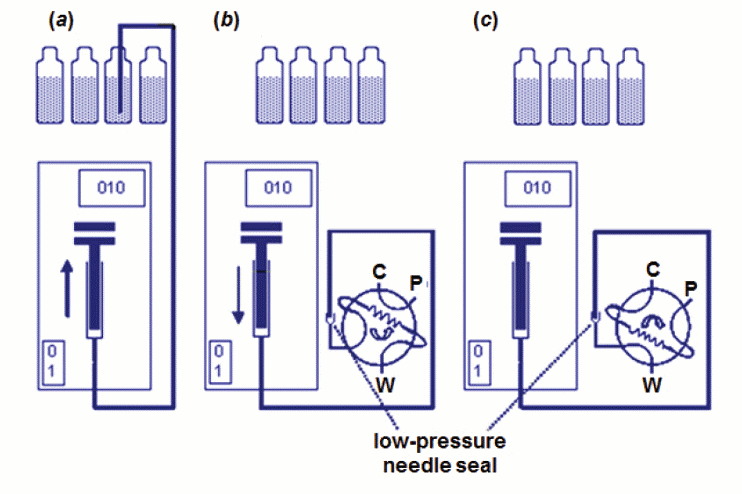
The injector needle typically is mounted at the end of a flexible tube that serves to hold withdrawn sample and connect the needle to a microsyringe mounted on a motorized device that can be programmed to withdraw different volumes of sample from the sample vial. The injection valve is usually a standard 6-port valve with connections to the column (C), pump (P), waste (W), and the inlet port where the sample is transferred. In the push-to-fill design shown in Figure 1, a sample loop is mounted to connect the two remaining ports on the valve. Typically a 100 µL loop is used, but other sizes are optional.

Figure 1
The push-to-fill autosampler shown in Figure 1 closely mimics manual injection. In Figure 1(a), the needle is indexed to the desired sample, the needle punctures the vial septum and is dipped almost to the bottom of the vial. The syringe mechanism then withdraws the plunger, pulling a desired volume of sample into the needle and connecting tubing. Next, in Figure 1(b), the needle is withdrawn from the sample vial and moved to the injection valve, where it is inserted into a low-pressure connector and the syringe mechanism pushes the plunger in to transfer sample to the sample loop. Finally, in Figure 1(c), the injection valve is rotated so that the flow from the pump (P) to the column (C) is now directed through the sample loop and sample is swept onto the column.
The push-to-fill autosampler is quite simple and reliable. It can be operated in the filled-loop mode, where excess sample is pushed into the loop and the volume of the loop dictates the injection volume. Alternatively, it can be used in the partial-fill mode, where only part of the loop is filled, with the syringe mechanism controlling the injection volume. This latter technique is most popular, because a large (e.g., 100 µL) loop can be mounted and any volume up to the loop volume can be injected. As mentioned in HPLC Solutions #119, the precision of the mechanized syringe is such that peak area imprecision of <0.5% is typical for autosamplers.
The weak point of the push-to-fill autosampler is the low-pressure needle seal. This will wear with time and may leak. Most systems use a finger-tightened PEEK fitting for the seal, so it is easy to tighten the seal when the needle is inserted – just twist the fitting until it is tight around the needle. If the seal still leaks, replace it. Occasionally the sample needle will bend if misaligned or become blocked with a bit of the vial septum, but the needle is relatively inexpensive and is easy to replace.
This blog article series is produced in collaboration with John Dolan, best known as one of the world’s foremost HPLC troubleshooting authorities. He is also known for his research with Lloyd Snyder, which resulted in more than 100 technical publications and three books. If you have any questions about this article send them to TechTips@sepscience.com


